Posts tonen met het label Cake. Alle posts tonen

14 november 2016

Slagroomtaart, maar dan een lekkere

Een traditonele nederlandse slagroomtaart. Wie houdt er niet van? Ik, dus toen ik werd gevraagd een slagroomtaart te maken voor het 60 jarige huwelijk van de ouders van vrienden, ben ik gaan kijken welke aanpassingen ik kon doen om te zorgen dat ook deze taart om van te smullen is.


De cake is een génoise volgens frans recept. Gebakken in een springvorm van 26 cm en horizontaal in twe lage gesneden. Tussen beide lagen een dun laagje abrikozen jam. Vervolgens de crème die uit slagroom en mascarpone bestaat. Gesneden aardbeien en blauwe bessen maken de vulling compleet. 
Aan de zijkant van de cake zit tegen de crème een victoria beslag (suiker en geschaafde amandelen samen gebakken en verbrokkeld). Op de cake toeven van dezelfde crème. Décoratie van verse vruchten (aardbeien, mandarijnen en kiwi). En tot slot zelfgemaakt chocolade versiering en lieftallig hartjes !

Mijn slagroomtaart !

26 januari 2016

Wortelcake met geroosterde wortelen

Wortelcake, carrot cake is een van mijn lievelingsgerechten. Ik hou van de smeuïge cake en de combinatie met de iets zurige cream cheese frosting. 

Toen ik het recept van een wortelcake die wordt gemaakt met geroosterde wortelen tegenkwam, duurde het niet lang voordat ik deze uitprobeerde. 
Het recept is van Olive Magazine, een brits kooktijdschrift en internet site. Ik heb een aantal recepten geprobeerd die zijn bevallen. 

Eerlijk gezegd, was dit bij het recept van de wortelcake niet het geval. De cake zelf was erg vast en de crème haalde het niet bij de vertrouwde cream cheese frosting. 
Dat de cake zo vast was, heeft vast te maken met de ingrediënten en de wijze waarop hij wordt gemaakt: het laten smelten van de boter, met golden syrup en black treacle. Ik vond ook de sinaasappel te veel overheersen. 

Het idee echter van het roosteren van de wortels is er wel één die ik ga onthouden. Ook ben ik dol op maple syrup dus dat houden we ook in gedachten. Wellicht dat met enige aanpassingen deze wortelcake toch een favoriet kan worden. 


Voor de cake heb je nodig: 
350 gram geschilde wortelen, waarvan 250 gram in de lengte gehalveerd
1 sinaasappel, geraspt en in 5-6 plakjes gesneden
140 gram boter (en wat om de bakvorm in te vetten
140 gram lichtbruine basterdsuiker
30 gram black treacle
70 gram golden syryp
2 geklutste eieren
100 ml volle melk
275 gram bloem
1 tl gember
1 tl kaneel
andere specerijen die je kunt toevoegen zijn: mixed spice, chinese 5 spice, kruidnagel, dit past allemaal goed in een wortelcake
1 ½ tl baksoda


En voor de crème:

350 gram ongezouten boter (kamertemperatuur)
375 gram gezeefde poedersuiker
3 el maple syrup (en extra voor de decoratie)
3 el sinaasappelsap


En zo maak je de cake:
Verwarm de oven voor op 200 ° C / fan 180C. Wikkel de gehalveerde wortelen (dus de 250 gram) en plakjes sinaasappel in stuk bakpapier. Plaats het pak in de braadslee en bak vervolgens een uur, totdat de wortelen en de sinaasappel goed zacht zijn.

Doe de geroosterde worteltjes en twee stukjes sinaasappel in een keukenmachine of blender en whiz tot een puree.

Zet de oven terug naar 160C / fan 140C. Beboter en bekleed de bodem van een diepe, ronde taartvorm van 20cm. Doe de boter, de suiker, de golden syrup en black treacle in een pan en verhit tot alles is gesmolten. Laat het afkoelen.

Rasp de resterende 100 gram wortel. Roer de wortelpuree, geraspte wortel, eieren, sinaasappelschil en de melk, de bloem, bakpoeder en specerijen in het afgekoelde mengsel. 
Doe het goed vermengde resultaat in de bakvorm en bak minimaal 1 uur. Bij mij duurde het langer. 

Voor de crème klop je eerste de boter in ongeveer 5 minuten tot een romige massa. Zeef vervolgens de poedersuiker er beetje bij beetje bij. Voeg tenslotte de maple syrup en het sinaasappelsap toe. Klop minimaal 5 minuten door om de crème zo luchtig mogelijk te maken. 

Als de cake volledig is afgekoeld, snij je hem horizontaal in 3 lagen. Dit gaat makkelijker als de cake een tijdje in de koelkast heeft gestaan. Vervolgens kan je de crème aanbrengen. Als je wilt dat de crème in bolletjes zichtbaar blijft tussen de lagen, zorg dan dat de opgespoten crème gekoeld is, dan zakt hij niet in als je er een laag cake opzet. 

Maak de cake af door er wat maple syrup over heen te gieten. 


25 maart 2013

Chocolate-Cherries Cake

Special order this weekend for the new elected chairman of the dutch rowing association. 
Flavor of the day: a 4 layer cake, half chocolate, half vanilla, with mascarpone-whipped cream filling and cherries. Decorated with chocolate shavings. 
One big tasty cake ! 


17 maart 2013

Carrot and ginger cake


Carrot cake is not only one of my favourite cakes; it is also the one cake that seems to please my brother. So when I wanted to bake him a cake for his birthday, there was only one option. To keep things interesting for me as well, I found a carrot cake recipe I hadn’t tried before. Since it is another Hummingbird Bakery recipe, I was confident enough to make it for the big day. This carrot cake has fresh root ginger in it, and you can really taste the difference...
As we had the cake for dessert, I decided not to ice it all over. I spread a cream cheese lemon icing between the layers and some on top of the cake.

The recipe is for a 4 layer cake. I decided to make 2 cakes. The first one was eaten by the family. And the second will be served at my brother’s work tomorrow. If that doesn’t tell me he liked it…


Carrot and ginger cake

Ingredients cake
450 g peeled and finely grated carrots
2 tbsp peeled and grated root ginger
80 ml buttermilk
3 large eggs
½ tsp vanilla extract
350 ml vegetable oil
420 g caster sugar (I used soft brown sugar)
500 g plain flour
2 tsp baking powder
1 tsp bicarbonate of soda
 1 tsp salt
1 tsp ground cinnamon
1 tsp ground ginger
80 g pecans, chopped (I used walnuts)

Preparations

Preheat the oven to 180° and line the 4 sandwich tins with baking parchment.
Using a handheld electric whisk or a freestanding electric mixer with the paddle attachment, mix together the carrots, root ginger, buttermilk, vanilla extract, vegetable oil and sugar until all the ingredients are well combined.

Sift together the flour, baking powder, bicarbonate of soda, salt and ground spices, then slowly beat this into the egg and carrot mixture, adding the dry ingredients in three batches. Mix well after each addition, scraping down the sides of the bowl to pick to pick up any ingredients that may have got stuck there. Stir in the chopped pecans and mix the cake batter until it is smooth and even.

Divide the batter between the four prepared sandwich tins and bake for approximately 30 minutes or until the top of each sponge bounces back when lightly pressed. Allow the cakes to cool completely, on a wire rack while you make the frosting.


Besides the carrot cake, there were some savoury minicupcakes and a leak-goat cheese pie:


5 maart 2013

Banana Pecan Loaf


Bananas are back with a second recipe. This one is from the new Hummingbird Bakery book “Home Sweet Home. Being a true Hummingbird fan, I have had it in my possession since the day it came out.

I replace the Brazil nuts by pecan nuts. Will definitely redo the original recipe since the loaf was a big hit!

No recipe here for this lovely loaf. You’ll just have to buy the book !


The banana brazil nut loaf is the second recipe from this book I have tried. The first one was the lemon cake which I never tasted since I made it for an order. I have been told it was gorgeous. So go on and buy Home Sweet Home. 

17 juni 2012

Orange Cake

To be honest, I made this cake for Queens day. April 30 is a national holiday in the Netherland, when we celebrate the birthday of our queen's mother: Juliana.
The royal family's name being Orange, this color is known as our national color.


Today is a big day for 'Oranje', our national soccer team. In order to go to the next round in the European Championship, they must beat Portugal with a 2 goal-difference. And at the same time hope the Germans beat Denmark.


Will tonight bring victory or defeat? Anyhow: there will be cake !


14 juni 2012

Black&White Layer Cake

Whenever my baking urge is strong at the beginning of the weekend, and cupcakes are not an option since I always want them to be as fresh as possible when taking them to work, I go for a big layer cake! 

This one has 5 layers and is made of devil' food cake and a white cake. In between some home-made strawberry jam. Strawberry Swiss Meringue Butter Cream to finish it !Very yummy !


1 april 2012

Not so red but very velvety cake

I always find it difficult to get the real red that makes a red velvet cake or cupcake. The new bought red liquid red might be easy to use but it definitely does not get me the red I wanted. But … as long as the cake is velvet, right? And velvety it is!
Read with me for another successful Hummingbird Bakery recipe. The recipe is for 12 to 16 cupcakes and is perfect for 2 20cm round baking pans.

For the cake you will need:
120 g butter, softened
300 g sugar
2 large eggs
20 g cocoa powder
40 ml red food colouring
1 tsp vanilla essence
300 g plain flour
1tsp salt
240 ml buttermilk
1 tbsp white vinegar
1 tsp bicarbonate of soda

Grease and line your pans while you preheat your oven at 190°.
Cream the butter and the sugar together until pale and fluffy (best cake related word ever). Break in the eggs one at a time, beating thoroughly after each addition and mixing in the scrapings from the side of the bowl.
In a separate bowl, stir together the cocoa powder, food colouring and vanilla essence to form a paste. Add the paste to the batter, mixing thoroughly until the paste is completely incorporated.
Sift together the four and salt in another bowl (yes you will need all the bowls so better have a dish washer or no fear of washing up), then add the flour to the batter in two batches alternating with the buttermilk. Lastly, in another bowl (told ya!), mix together the vinegar and bicarbonate of soda (and look closely what happens here: baking is chemistry!) by hand and add it to the cake batter mixing it in until it is fully incorporated.
Spoon the batter into the prepared baking pans. To make sure that each pan has the same amount of batter, I use (as I do to fill cupcake cases) an ice cream spoon: around 10 each will do.
Place in the oven and bake for 20-25 minutes.  Allow to cool for a while before removing the cakes from the pan to continue cooling on a rack.


For the frosting you will need
100 g butter softened
600 g icing sugar
250 g cream cheese (such as Philadelphia)
Beat the butter and the icing sugar together until no large lumps of sugar remain and the mixture is sandy in texture.
Add the cream cheese and mix together slowly until everything is incorporated, then increase the speed to medium and beat the frosting until it is soft and fluffy (yep! Again).

I choose to cut both cakes into two layers and spread a thin layer of frosting between every layer. If you prefer thick layers of frosting you can choose to leave the cakes as they are and just stick them together with lots of cream cheese frosting.


Preview of two upcoming recipes


31 juli 2011

Gâteaux: Chocolat-Framboise-Eau de Rose

Quand j'ai fait le gâteau  "Ange ou Démon Ruffles Cake" , j'avais congelé les deuxième gâteaux de chaque parfum. Cette fois ci, une confiture de cerises maison entre les couches et un buttercream à l'eau de rose tout autour. 


Je n'ai pas pris le temps de bien le prendre en photo, mais voici quand même un aperçu.


J'en profite pour vous montrer quelques photos des Cupcakes Noix de Pécan-Sirop d'Erable que j'ai fait en milieu de semaine passée. La recette de ces cupcakes est ici


14 juli 2011

Gâteau du 14 Juillet

Bon 14 juillet à tout le monde 

Ca fait plus de 11 ans que je suis en France, donc ce jour est aussi un peu devenu ma fête nationale !
Un gâteau s’imposait pour fêter « Bastille Day » comme les anglais appellent le 14 juillet. Il s’agit d’un gâteau très chocolaté avec un glaçage au cream cheese.


Ce gâteau est inspiré par celui-ci. J’ai fait plus simple. De plus, il était nettement plus joli dans ma tête… mais faire des « ruffles » n’est pas si simple ! Promis, je ferai une nouvelle tentative bientôt et vous monterai le résultat. 


3 juli 2011

Gâteau banane, confiture de lait et mascarpone

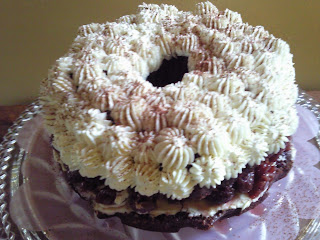
J’ai encore craqué. Pour un moule à gâteau cette fois-ci. Mon œil est tombé sur un moule à kouglof. Et dit nouveau moule dit nouveau gâteau. Il me fallait un gâteau bien solide pour ce moule et comme j’avais mangé un banofee la semaine avant, j’ai pris la recette du gâteau à la banane de Happy Gâteau. A la place de la buttercream dans la recette originale, j’ai fait une crème au mascarpone et mis une petite couche de confiture de lait et des bananes entre deux étages du gâteau. Je ne pense pas avoir besoin de vous dire que ce gâteau est très bon, si ?

Gâteau à la banane, à la confiture de lait et à la crème au mascarpone

Pour le cake

Ingrédients
2 bananes mûres
40 g de crème fraîche
3 œufs
2 c.a.c. de jus de citron
1 ½ c.a.c. d’extrait de vanille
240 g de farine (T65)
170 g de sucre
1 c.a.c. de bicarbonate de soude
¾ c.a.c. de levure
½ c.a.c. de sel
130 g de beurre doux, ramolli

Préchauffez le four à 180°. Tapisser ou beurrer le moule
A l’aide d’un mixeur, mélanger les bananes et la crème fraîche, puis ajouter les œufs, le jus de citron et la vanille. Bien mélanger et réserver.
A part, mélanger tous les ingrédients secs. A vitesse minimum, ajouter le beurre coupé en morceaux et la moitié de la préparation à la banane. Bien mélanger à vitesse moyenne pendant 2 minutes jusqu'à obtention d’une pâte homogène. Bien racler les bords puis ajouter la préparation à la banane restante.
Versez la pâte dans le moule, lisser la surface en enfourner pour 30 minutes environ.
Laisser complètement refroidir le gâteau avant de démouler.

Pour faire un gâteau à étages comme celui, il est mieux de laisser durcir le gâteau au réfrigérateur pour quelques jours ou même toute une nuit. Il sera plus facile à couper. N’oubliez pas de l’envelopper dans du film alimentaire.

Pour la crème au mascarpone

Ingrédients
250 g de mascarpone
50 ml de crème fleurette
30-50 g sucre glace
1 c.a.c. d’extrait de vanille

Battre le mascarpone jusqu’ç ce qu’il soit crémeux puis ajouter la crème petit à petit, la vanille et le sucre. Bien mélanger.
Placer la crème au réfrigérateur pour qu’elle devienne plus solide.

Pendant ce temps, couper votre gâteau en deux. S’il a trop monté pendant la cuisson, égalisez-le pour qu’’il tient bien droit. Posez la partie basse sur un carton à gâteaux. Cela facilitera son déplacement.

Repartir quelques cuillères de confiture de lait sur la première couche de gâteau. Coupez une banane en fines tranches et mettez-les sur la confiture de lait.

A la poche à douille ou avec une cuillère mettez la crème au mascarpone sur les bananes. Prenez la deuxième couche de gâteau et posez-la doucement sur la crème. S’il vous reste de la crème vous pouvez, comme moi, vous amuser avec la poche à douille pour faire une décoration sur le gâteau. 

21 juni 2011

One very Happy Gâteau

Et de deux... 
Deuxième recette de "Happy Gâteaux". Un gâteau au noix de coco à étages.


LinkWithin

Related Posts Plugin for WordPress, Blogger...